Tuesday, February 10, 2015

ARE "FILM SIMULATION" PRESETS FOR YOU?

MONOCHROME+YeFilter* (black and white with yellow filter)
Fujifilm recently announced that they are bringing film simulation to their official Raw conversion software, Raw File Converter EX, allowing you to take advantage of the features after, rather than having to make the selection while shooting.

This is good news since I think Fuji does an especially good job with their film simulation modes.

Currently when you select one of the film simulation modes, Provia, Velvia, Astia, PRO Neg Hi or Std, and several Black and White modes, on the camera, they are baked into the JPEG file.

As I've mentioned previously on this blog, the mode I prefer when shooting the X100S is MONOCHROME+YeFilter. But that is only half the story because I also shoot JPEG and Raw at the same time giving me the option during post processing to switch to color or do my own black and white conversion to the Raw file. But normally I really like the job Fuji does with its conversion right out of the camera and then spend extra time converting the Raw image to match.

Does this then mean you no longer need these settings available to you on the camera? I can't make that call, but I do like the option to take advantage of them later.

During a recent visit to Great Falls Park in Virginia, I decided to try out the various film simulation modes on my X100S and see for myself how useful they are. **

Provia/STANDARD: I suppose you need an all-around setting and PROVIA/STANDARD offers standard color reproduction suited for a wide range of subjects.
Velvia/VIVID: A high-contrast palette of saturated colors, suited for outdoor photos. And as it turns out, pretty much the hands-down choice for Fall foliage.
ASTIA/SOFT: Enhances the range of hues available for skin tones in portraits while preserving the bright blues of daylight skies. Outdoor portraits.
PRO Neg. Hi: Slightly more contrast than PRO Neg. Std and recommended for outdoor portrait photography.
PRO Neg. Std: Soft-toned palette. The range of hues available for skin tone is enhanced, making this a good choice for studio portraits.

The Fuji X100S also offers the option to bracket, which to most photographers means some sort of multiple exposures. However, the X100S also allows you to bracket Film Simulations, so you don't even have to stop shooting to change settings.

Starting February 26th, you will be able to download the program for free from the Fujifilm website.

But you will have to wait for this feature to be added to the X100S since initially it will only be available for the X-T1, X-A2, X100T, X30, and XQ2.

* All the photos associated with the blog post are resized JPEGs right out of the camera.
** You can also assign a film simulation mode during playback.

Wednesday, October 01, 2014

MAKING TIME TO PHOTOGRAPH THE NORTHERN LIGHTS

Aurora Borealis
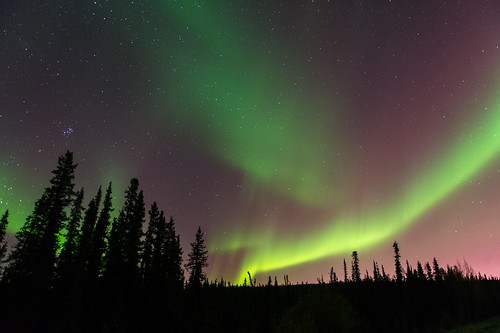
A slightly longer shutter speed allowed additional colors to appear. 1/8 @ f2.8, ISO 3200.
One benefit of traveling on assignment is that you often find yourself in places that you might not otherwise have had the opportunity to visit. And whenever I find myself in these locations, I make it a point to take full advantage of all the photographic opportunities available.

Just to be clear, the assignment that I'm getting paid for always comes first, which means that I really have to muster the energy to do personal work. This was certainly the case on a recent trip to Fairbanks, Alaska, to document Navy-sponsored Arctic research.

Prior to any trip I will conduct a web search looking for things to do and see at that location. Imagine my surprise when I kept seeing photographs of the Aurora Borealis, or Northern Lights. Was it possible that I would get the chance to not only see this, but photograph it? For some reason I thought you had to be much farther north.

Aurora Borealis
The intensity of light was constantly changing which meant I had to keep adjusting shutter speed. 1/2 @ f2.8, ISO 3200.
As you can see from the photographs accompanying this blog that I was treated to a spectacular sight. Some tips and a little more about what it took to take these photographs follow.

1. Getting the photograph means you might lose a little sleep. Rarely are the best outdoor or landscape photographs taken mid morning, just after a leisurely breakfast and before a long lunch. Most of the time getting the best means setting up before the sun rises and staying out after it sets. Of course there is still time for that leisurely lunch, and maybe a nap in the middle of the day, unless you are getting paid to be there, then you have to make the extra effort. So to photograph the Northern Lights I had to set my alarm for midnight, and not just one night, but for three nights in a row until I finally found success.

2. Shooting something for the first time, means experimentation. I had never photographed the Northern Lights, but I have photographed stars, so I knew that I first needed a location away from the city lights, which in Fairbanks meant about a ten minute drive. Ideally you would scout these locations during the day, but remember since I was on an assignment, I had to locate a safe and awesome location in the dark, which I fortunately did. On the second night it was clear and the sky was filled with stars, but I didn't see signs of the Aurora Borealis. However, just because I didn't see what I was looking for, didn't mean I wasn't going to still take pictures.


Aurora Borealis
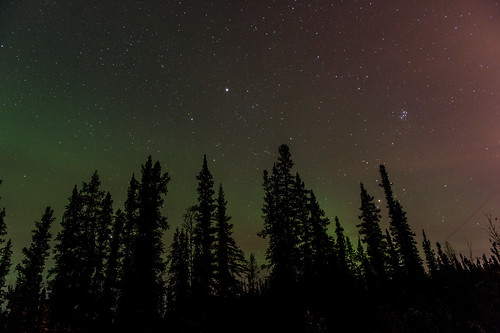
I did not realize that I had captured a faint glow of the Northern Lights on the second night until I downloaded and post processed my photos. 1/13 @f2.8, ISO 1600.
3. Sometimes luck, even beginners luck, is your friend. If you asked me when I returned to the hotel that second night if I had any success, I would have said no. So imagine my surprise when I imported the images into Lightroom 5 and saw the subtle green and yellow hue in the sky. After some post processing, I liked the images enough to share, but still felt I missed out since I didn't actually see anything with my own eyes. Don't give up just because you don't see anything with your naked eye.

4. Persistence pays off. On the third night I once again woke up at midnight and headed back to the same location as the previous night, only this time as soon as I stepped out of the car, even before my eyes adjusted to the darkness, I could see streaks of green in the sky. By the time I set up my tripod and camera, the lights were sweeping across the night sky. I started with the same camera settings as I had the previous night and could tell right away that I wasn't even close. Remember tip two, experiment and don't get flustered. This time instead of a standard night star setup of a 15-20 second exposure at ISO 3200, I was at a two to four second exposure at ISO 1600. Any longer on the exposure time and the lights were really soft because they were moving and "dancing" so fast. Given more time I probably would have experimented more with that longer exposure.

5. Look 360 degrees. At first I was really focused in one direction which had a good foreground of pine trees. It wasn't until I relaxed a bit, turned and started looking around, that I realized there were photo opportunities everywhere, even straight up. I just kept shooting with the Nikon 24-70mm and even though I did bring the 70-200mm with me, for some reason I left the 14-24mm lens in the room. In total, I spent around an hour taking pictures and if it wasn't for that pesky aforementioned assignment, I would have stayed all night.

Aurora Borealis
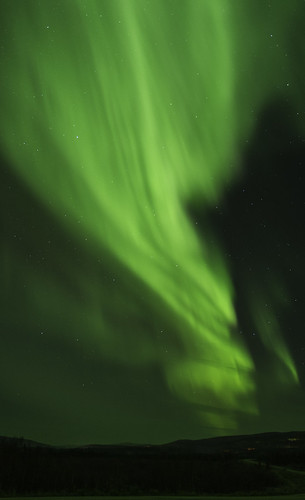
Even shooting vertical at 24mm I was not able to capture everything I was seeing. 1/5 @ f 2.8, ISO 1600.
After seeing the Northern Lights with my own eyes, I don't regret any sleep I missed and even as I sit here in the Anchorage airport with a five hour layover and another 16 hours before I'm back in Virginia, the lights are still bright in my eyes.

Bonus tip: Many of the hotels in Fairbanks maintain a wake up list if you wish to be notified whether the Aurora Borealis is active on a particular night. My advice, just get out there and shoot; you may discover more in your photograph than you expected.

Thursday, September 18, 2014

WHY ARE YOU WAITING TO TAKE THAT PICTURE?

You can't get the photograph, in this case the U.S. Air Force Memorial, if you don't stop and take the picture.
Stop and take that photo today! You know what I'm talking about. Have you been driving past a location every day and thinking what a nice photograph that would make. Why haven't you stopped? What are you waiting for? After all, don't you owe it to yourself to at least stop and see if it truly is your next great photograph or if it is one you can cross it off your list.

Do you make excuses like waiting for the right light or you have to be somewhere in a hurry. I understand, but then how do you explain that when the light is perfect and you have all the time in the world, you still don't stop.

Are you afraid to be disappointed? It happens, that somehow the photo you've pictured from the seat of your car driving by at 50 m.p.h. may in fact look very different when you stop and get a closer look. But the point is, how will you know unless you actually stop.

The two photos posted here are good examples of what I'm talking about. The Air Force Memorial itself can be interesting, but it wasn't until I saw it against a backdrop of storm clouds that I really took notice. The problem was, I saw this same picture on several occasions and just kept driving. Well, earlier this month I finally stopped and captured the image that I had seen previously. I was glad I finally stopped and am pleased with the photo.

I've been looking at this pickle from my car seat for a year and never stopped. Not thrilled with results, but not ready to cross of my list yet.
I've been looking at this pickle from my car seat for a year and never stopped. Not particularly thrilled with this result, but I'm not ready to cross of my list.
The other thing I've witnessed from my car seat is a large pickle, or what I believe is a pickle (it could be a cucumber), that hangs between two buildings just off the road. I was intrigued and couldn't figure out why it was there, after all there isn't a pickle shop, or even a deli nearby. I guess it really doesn't matter, because once I noticed it, I couldn't drive by without checking it out and thinking about photographing it.

So after nearly a year, yes, a year, I finally stopped and took a picture. The light was alright and the picture is not what I pre-visualized, but at least I finally stopped. I also learned that when I try this again, and yes, I will try again, it will be early in the day, or maybe with a clouds in the sky, but I will take this photo again.

So are your ready to stop and get the picture? Don't wait any longer!

Thursday, August 21, 2014

DOES PHOTOGRAPHY EVER BECOME EASY?

Breaking the bottle during the R/V Sally Ride christening.
Why was I feeling so much stress about capturing this photograph?
I was wondering during a recent assignment in Anacortes, Wash., while covering the christening of the Research Vessel Sally Ride if even seemingly easy assignments ever become routine.

I was just out there to photograph the christening ceremony of the R/V Neil Armstrong in March and I had no reason to believe that this event would be any different. Easy right? Probably the most important photograph during a ship's christening is the moment the sponsor breaks a bottle of champagne on the hull and during the Armstrong christening I got the shot, which was made even tougher due to the sponsor having to strike the bottle three times before it broke.

Having already covered the christening of the R/V Neil Armstrong should have mitigated any stress I was feeling about covering the same ceremony for the Sally Ride, right?
That photograph of the bottle break along with the other coverage I provided, meant that when it came time to christen the sister ship, Sally Ride, my inbox began began to fill with inquires about whether or not I would be available to take the assignment. Of course I wanted to, ship's christenings happen only once, and being able to photograph such historic events is one of the reasons I enjoy what I do. I also realize that I'm not the only photographer capable of pulling that shot off, so was it really necessary for me to cover this assignment.

Ship's sponsor, Dr. Tam O'Shaughnessy, co-founder, chair of the board of directors and chief executive officer of Sally Ride Science, delivers remarks during the christening ceremony. The whole time I'm shooting this I'm thinking about the one shot that truly counts, the bottle break.
The reason I questioned whether or not I would go and all the anxiety I was feeling was centered around the events timing. This christening fell right in the middle of a challenging two-week assignment that I knew would require my full attention. An assignment that took months of planning and presented a host of challenges that needed to be overcome in order to produce a product that would meet every one's expectations. I can't discuss that project now, but thinking about leaving right in the middle of that assignment to spend 36 hours in Anacortes, Wash., was a tough decision to make.

In the end I did agreed to cover the Sally Ride christening and was able to capture the shot needed to tell the story, but during the flight to Seattle and while waiting for the ceremony to start, I also spent a lot of time thinking about the topic of this post.

Rear Adm. Matthew Klunder, chief of naval research, delivers remarks. If I was going to lug my Nikon 14-24mm lens across the country, I was going to use it to capture at least one photograph.
Why was I feeling nervous as I went over my camera settings and scouted shooting angles. Was it due to a lack of confidence in my ability or the fact that so many were depending on my coverage which needed to be transmitted within hours of the ceremonies conclusion? Or was it something else? Was I still focused on the larger assignment I had left.

I believe I've reached a point in my career where I'm confident that I can cover any photo assignment. But having confidence doesn't diminish the angst or the questioning of ability. Having confidence just means I believe I have the skills needed, skills that come from years of work, but also from constantly learning from others and a willingness to experiment and stretch my comfort zone.

So is there ever a time in ones photographic career that an assignment becomes routine, that the nervousness goes away, and the pictures just appear.

Well if there is, I'm certainly not there and I suspect that I never will be. I also suspect I'm not alone.

Saturday, July 12, 2014

EARLY DIGITAL CAMERA AND PUBLISHING FIRSTS

Tear sheet showing stand-along photo taken with the Kodak DCS 460 as it appeared in the May 11, 1996 Philadelphia Daily News. Was this a first?
Tear sheet showing a stand-alone photo taken with the Kodak DCS 460 as it appeared in the May 11, 1996, edition of the Philadelphia Daily News. Was this a first?
Last year I read an article on Popphoto.com titled "The 30 Most Important Digital Cameras of all Time," and the first thing that struck me was how many of these cameras I had the opportunity to use or at least get my hands on and the second thing was how far we've come in both quality and price.

It also got me thinking about the first image I had published that was taken with a digital camera. Actually it was published twice.
The Kodak Professional DCS 460 Digital Camera was introduced in 1995.
The camera was a Kodak Professional DCS 460 which had a list price of $35,600, a 1.3x crop factor and at 6.2 megapixels was the highest resolution digital camera available at the time.

In May of 1996 I was a photo editor and producer for Philadelphia Online (now Philly.com) and was working on an interactive seating map of the Blockbuster Sony Music Entertainment Center in Camden, N.J., and since I had access to the DCS 460, I decided to use it as I photographed the stage from various sections of the arena. A great time saver over shooting on film and scanning the negatives.

On the way to the venue, I came across an accident on Spring Garden Street where a car had smashed into the front window of Panichelle's barber shop. As I drove by I thought I caught a glimpse of the barber inside continuing to cut hair, so I parked, grabbed the camera and walked back to the barber shop and started shooting photos.
Stand-alone photo as it appeared on the May 10, 1996 homepage of Philadelphia Online.
Stand-alone photo as it appeared on the May 10, 1996, homepage of Philadelphia Online. View full homepage from that day.
After I returned from the original assignment in Camden I downloaded the images from the camera and was showing a few editors the shot when one of them suggested we post it to the Philadelphia Online home page as a stand-alone photo, something we hadn't done previously. This was a first.

The other suggestion was to show it to the photo editors at the Philadelphia Daily News, where it was published as a stand-alone photo the next day.

So was this the first digital camera photo, not from a wire service, published in the Philadelphia Daily News? Hardly a case for the History Detectives, but I know if I had shot this with film, I probably wouldn't have processed it until the next day and by that time it would not have been news.