Monday, December 30, 2013

AS SCENE FROM A TRAIN - FIVE TIPS FOR BETTER PHOTOGRAPHS

Amtrak-2
Photographing an urban scene like this one as the train left Central Station in Montreal offers a different viewpoint of the city. 1/200 @ f5.6, ISO 200.
Traveling by train can be a wonderful experience, sitting comfortably as the world passes by just outside your window. I suppose if you commute daily by train you might not see it as the same wonderful experience, however, whether the train you are on is traveling through a beautiful countryside or the forgotten parts of a city, there is no reason why you shouldn't be able to take out your camera and make some amazing photographs.

We have all seen photographs out of airplane windows. Instagram anyone? Perhaps they are a bit cliche, although I actually don't mind them. Less often though do you see photos taken from a train and that's a shame. Maybe it is because more people fly, I don't know, but the opportunities to capture unique views from a train are endless. And many times it is not even possible to tell from the photograph that it was taken through a window while traveling upwards of 60 miles per hour.

Upstate New York
Taking advantage of the stopped train while waiting to cross the border from Canada into the United States allowed me some extra time to compose this shot which would have been difficult with the train moving due to the strong back light. 1/950 @ f5.6, ISO 400.
So what do you photograph? Think about the difference between trains and cars, besides the fact that trains are on rails and cars are on the road, but what does that offer you visually. If you think about it, roads generally pass by the front of buildings and houses, whereas trains travel behind, which makes it possible to capture a unique perspective. If you are out west or up north, it can be about beautiful landscapes, but most trains travel through urban and industrial areas as well so you see the back side of the city or urban landscape. Take advantage of both and you will be surprised at what you capture.

Amtrak-3
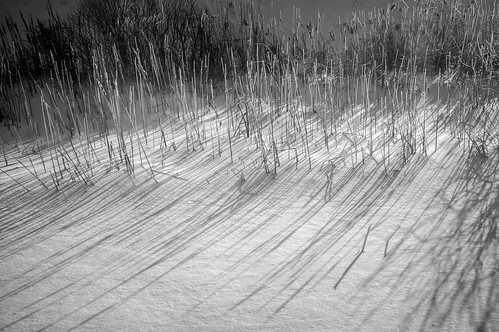
Notice how the foreground is a blurred. I still think it adds some interest. 1/500 @ f5.6, ISO 200.
Before you break out your camera on the next trip from Washington, D.C., to Philadelphia or beyond, let me offer some tips to help you start making beautiful images from the comfort of you train seat. And you barely have to put down your drink to do it.

Five Tips to make better photographs during your next train journey:

1. Pick a good seat. It might seem obvious, but you really should chose a window seat, otherwise you better get to know the person you are sitting with very well. Somewhat joking, but there a few ways to ensure you will get a window seat and a good one at that. Use red cap or a similar service even when you don't need assistance with your luggage because they will get you on the train before everyone else and that is well worth a few dollars. Boarding early also gives you the option to pick a seat with the cleanest, least scratched window. Finally, not all window seats are created equal, so make sure you get one that is more or less centered on a window.

Hudson River
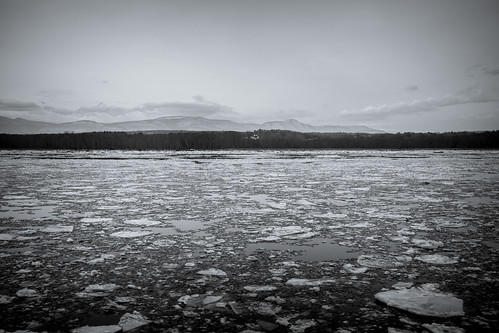
I selected the left side of the Amtrak Adirondack train from New York to Montreal because I knew the Hudson River would be out my window during most of the trip. The ice was a bonus. 1/1250 @ f2.8, ISO 400.
2. Select the side of the train that will afford you the best views. If it is not a route you are familiar with, then a little research will go a long way. Google maps does show train tracks. Another consideration when selecting which side to sit will be the direction of light. Shooting into the sun can create some interesting photos, but remember that you are shooting through a window so the sun glare and reflection may not allow for photographs. Compare it to sun glare on a dirty windshield, it is the same thing.

Albany
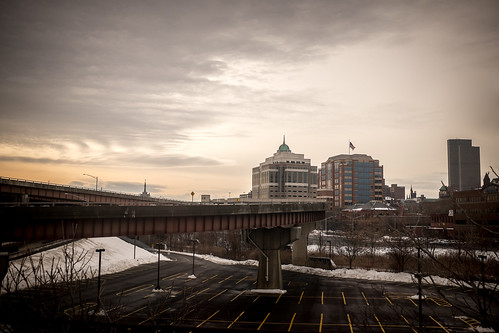
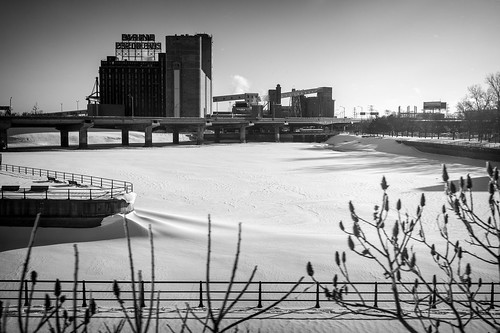
Downtown Albany, New York, as the sun goes down. I like the empty parking lot and elevated shooting position. A view that would be difficult if not for riding on the train. 1/1250 @ f2.8, ISO 400.
3. Pay attention to your aperture. Selecting a wide aperture, f 2.0 - f 5.6, will limit the effects of shooting through the window, similar to shooting through a fence. If you have the time and can do it safely, clean the window from the outside prior to boarding. Of course you should check with train personnel before you do this just to be on the safe side. But at a minimum, wipe the inside of the window. You don't have to shoot wide open though because you do want some depth of field, but too much and you will be spending a lot of time cloning out spots caused by the window.

4. Shutter speed matters. Objects close to the train will blur even at relatively fast shutter speeds. If you are shooting objects in the distance without a foreground then you can get away with a slower shutter speed even on a fast moving train. If a fast shutter speed is not possible or you are just looking to get more creative, then slow the shutter speed way down and blur the scene as you pass by. Instead of you panning with the camera, let the train do it for you. Think about this technique to photograph trees during the Fall.

Amtrak-1
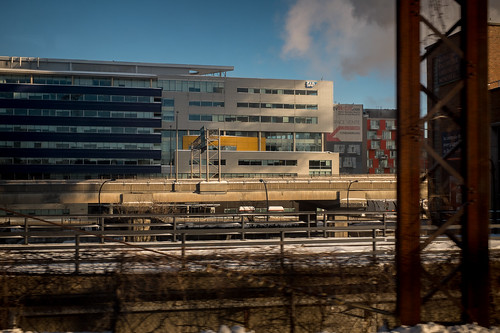
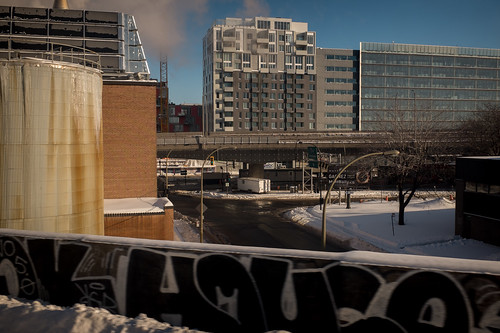
Photographing the backside of the city. The slightly burred train structure at the right adds just enough context to let the viewer know that this photo is taken from a train. I like the industrial look and hints of color in this image. It can be hard to frame a shot while the train is traveling at 60 m.p.h. so take plenty of shots.  1/160 @ f5.6, ISO 200.
5. Always be prepared to shoot and when possible try to anticipate what's coming up. Even when you are very familiar with the route, the view outside will pass by quickly so you need to keep your camera ready and as close to the window, without touching it, as possible. This might be a good time to mention that a wide angle lens works best, especially in a changing landscape. Fast moving trains make framing and shooting with long glass difficult. If the train is moving slowly or you are traveling the great plains, then this may not be a problem.

Take the time to shoot lots of pictures on your next rail journey and let the results surprise you and your friends. Besides, there is much more to see from a train window than from a plane window.

Check out Amtrak train routes and start planning your adventure today.

Monday, December 23, 2013

PHOTOGRAPHY GEAR - THE STOCKING STUFFER VERSION

Fireworks in Montreal, Canada, just before Christmas.
Montreal, Canada, December 22, 2013.
A few low-cost stocking stuffers just in time for Christmas. And I mean just in time.

If there is a photographer on your gift list or maybe you just feel like treating yourself, then I offer a few suggestions below. Most of these items are under $50.00 and even if you or the lucky person you are buying them for already owns a few of them, adding another will not be seen as a mistake. Like all my other gear recommendations on this blog, I own and use all these items.
Frio universal locking cold shoes

Having a few $13.99 Frio universal locking cold shoes around will allow you to couple your strobes to light stands. Forget one of these and you better have some $16.99 gaffers tape handy.

Manfrotto swivel lite-tite umbrella adaptor

Attaching your strobes to a light stand is one thing, but without a $34.19 Manfrotto swivel lite-tite umbrella adapter you won't be able to aim them correctly. And this also allows you to use an umbrella. Again without this you'll be back to using gaffers tape.

Think Tank double-sided non-slip camera strap

There are all kinds of camera straps out there from something you picked up while on vacation to Disney World, to some fancy overpriced leather model. For me personally, when it comes to a camera strap I prefer something simple like a $26.95 Think Tank double-sided non-slip strap.
Two versions of the clamps are shown, with and without the flash shoe.
I've talked about the $61.18 Manfrotto spring clamp with flash shoe, better known as the Justin Clamp,before. When you need to position a second strobe and a light stand is just not going to work, this clamp will get you out of a jam all day long.

Lastolite mini trigrip

I own quite a few reflectors and am well aware that a cheap piece of foam core will do the trick, but if you are a one-person operation, the $49.88 Lastolite 18-Inch mini TriGrip  allows you to easily position the reflector with one hand while holding a camera with the other. Also, if you happen to have an assistant, they will easily be able to hold this in one hand while positioning a strobe they are holding in the other hand behind it giving you some very nice diffused light.
Think Tank cable management 10 bag.


In my opinion you can't have enough bags and while backpacks and other camera bags are quite expensive, satisfy your need to get more organized with something like a $17.75 Think Tank cable management 10 clear plastic pouch. I use this pouch to hold the charger, cables and spare cards for my Fuji X100S. Maybe getting better organized is on your New Years resolution short list?

Think Tank red whips


And finally, if you think the above items are too expensive, you can't go wrong with a pack of ten Think Tank red whips at $7.99. You will be the envy of all the other photographers with tangled cables.

If you've read this far then I thank you for indulging me while I recommend some products via the Amazon associate program. I don't write this blog for profit, but the few dollars I mange to earn a month does provide me some satisfaction.

Street scene in Montreal Canada.
You don't want to be out in this weather shopping, do you?
I hope you all had a great year in photography and I wish you the best in the New Year.

Thank you again for visiting blog.jfwphoto.com in 2013 and remember to get out there and shoot!

Saturday, December 14, 2013

MEMORIAL DAY - A PERFECT DAY FOR A PHOTO WALK IN DC

The Martin Luther King, Jr. Memorial is the newest addition to the National Mall in Washington, D.C.
I know it is not the final Monday in May. This is memorial day with a small "m."

It started as a government snow day and it doesn't take much in the Washington, D.C., area for the government to shutdown due to weather, or even the threat of weather.

On these days the temptation is to stay inside, pour a second cup of coffee and just spend the day relaxing. Of course the other option is to grab a camera and take advantage of the weather and day off to get some unique shots. On this day, and after a text from a friend reminding me I should be out shooting, I decided to head downtown.

The Vietnam Veterans Memorial was the final stop and by this time the sun started to come out and made for some interesting reflections in the still wet stone.
In the absence of a specific assignment, I like to pick a theme prior to heading out on a shoot. It doesn't mean I have to stick with the theme, but I find that it is helps to focus, otherwise I just walk around aimlessly with my camera and end up disappointed at the end of the day. So the natural theme I self assigned myself was to capture Washington, D.C., under a blanket of snow.

Now remember when I said earlier in this post that it doesn't take much for the government to shut down. Well this was the case and as I exited the metro at Foggy Bottom it was apparent that my theme was already melting away. There was NO snow.

The Lincoln Memorial was a good starting point.
With that idea out I decided to just start walking in the direction of the Lincoln Memorial and see what I could see and before I realized it, I found myself walking from memorial to memorial and it hit me, or more specifically a new theme came to light; memorial day. Not the most original theme of course, but if you are in Washington, D.C., you really are in the perfect place for this kind of photo walk.

Map shows the route I took to capture memorial photos in Washington, D.C.
The route I took from the Lincoln Memorial to the Vietnam Veterans Memorial.
I started at the Lincoln Memorial (A) and made a counter clockwise loop ending at the Vietnam Veterans Memorial (E). Along the way I stopped at the Korean War Memorial (B), Martin Luther King, Jr Memorial (C) and the World War II Memorial (D).

Snow was the most apparent at the Korean War Memorial and somehow the most appropriate.
There were very few people around and while I usually try and include people in my photographs, this day I concentrated more on the memorials themselves. I carried only my Fuji X100S and shot in black and white mode all day.

Even though there was no snow, or very little snow on the ground, everything was wet which made for some great reflections. Also as the day wore on, the sky cleared up and provided some nice light and cloud formations.

Just because the theme for the walk was memorial day, it doesn't mean other things won't catch your eye along the way.
Give yourself an assignment or pick a theme to get started and get out there and shoot. Don't wait for a rainy day. But if it is raining, or snowing, all the better.